Monday, February 20, 2012

Cookie Dough Cheescake Bars

 by Alyssa


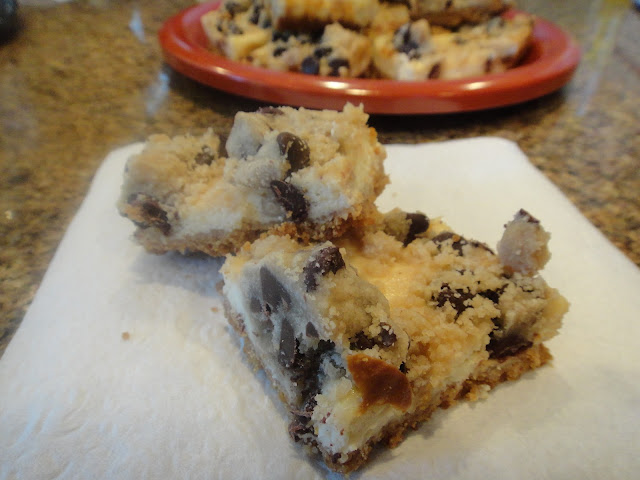
Chocolate chip cookie dough and cheesecake are two of my favorite desserts, so I knew I would love these bars! They were rich, indulgent, and absolutely delicious. Seriously, they were amazing! I definitely ate one for breakfast today.


The graham cracker crust is already super simple, but to save time, you can buy graham cracker crumbs instead of whole graham crackers. Make sure you press the crumbs into the pan evenly, because any thin spots may burn.


This recipe is super quick to make - you bake the crust for a few minutes, then while it cools, just mix up your cookie dough and cheesecake.


We rolled little teaspoon-sized balls of cookie dough and spread them out over the cheesecake, then sprinkled the rest of the cookie dough over the top. You could just sprinkle it all over the top also.


Cookie Dough Cheesecake Bars
Yield: 12 bars

For the crust:
1 1/2 cups graham cracker crumbs
5 tablespoons unsalted butter, melted

For the chocolate chip cookie dough:
5 tablespoons unsalted butter, room temperature
1/3 cup packed light brown sugar
3 tablespoons granulated sugar
1/4 teaspoon salt
1 teaspoon pure vanilla extract
3/4 cup flour
1 cup chocolate chips

For the cheesecake filling:
10 ounces cream cheese, room temperature
1/4 cup sugar
1 large egg, room temperature
1 teaspoon pure vanilla extract

Directions:
1. Preheat the oven to 325 F. Line an 8 inch square baking pan with parchment paper or foil, allowing a little overhang. Spray with non-stick spray.
2. Mix the melted butter and graham cracker crumbs until thoroughly combined. Press the mixture into the bottom of the prepared pan. Bake in preheated oven for 6 minutes. Remove pan to a cooking rack. Do not turn your oven off.
3. While the crust is cooling, prepare the chocolate chip cookie dough. In the bowl of a stand mixer fitted with the paddle attachment or in a large bowl with an electric mixer, beat butter, brown sugar, granulated sugar, salt, and vanilla until smooth and thoroughly combined, about 1 minute. Mix in the flour on low speed, just until incorporated. Mix in the chocolate chips. Set aside.
4. In the bowl of a stand mixer fitted with the paddle attachment or in a large bowl with an electric mixer, cream together the cream cheese and sugar until smooth. Mix in the egg and vanilla on low speed just until incorporated. Pour the cheesecake batter into the prepared crust. Using your hand to form clumps, distribute the cookie dough onto the top of the cheesecake batter in teaspoon sized clumps. Be sure to use all of the dough. You will cover most of the cheesecake batter. 
5. Bake for about 30 minutes, until the top looks dry and firm and the entire pan looks set if you give it a gentle shake. Move entire pan to a cooling rack and allow to cool completely.
6. Lift the bars out by the overhang; slice into desired sized and store in the refrigerator. Serve cold or at room temperature.

Happy baking!


Saturday, February 18, 2012

Update an Outdated Painting

By Alyssa


If you have ever been on Pinterest, you know that it has a ton of great craft ideas! I recently pinned a project to update an old painting, and this weekend we got the chance to try it out. Here is a tutorial on how to create this fun and simple piece of art! It is perfect for a cute and inexpensive addition to a dorm room or apartment.


First, choose your painting! You can use an old one that you have laying around the house, or you could buy one at a garage sale or thrift shop just for this project. We chose this unique nature/duck painting that our friend's mom had in her garage. As you can see, we thought these random ducks in the middle of the painting were just great :)


Next, pick the words you want to add. We decided on these song lyrics because they are meaningful to us. Since we were making the letters so large, we made our own letter stickers with this transparency and projector.  Regular letter stickers would be much easier, so if you are using those, skip this step!


My friend Jenna helped cut out the letters onto tape with an x-acto knife. This step was a little tedious but well worth it to get our desired look!


Next, attach your letter stickers onto the painting. Be sure to place them in a straight line, and use a ruler if you need to.


Here is the fun part! After the stickers are securely placed, paint 1-2 coats of paint (darker colors work best) over the whole canvas.


Wait for the paint to dry, then slowly and carefully peel off the stickers.


Here we are, along with our good friends Meagan and Jenna, with our finished product. This craft was so easy and so much fun! Thanks for stopping by our blog, and have a great day!

Friday, February 17, 2012

Lace and Thrifting

By Brianna


Last weekend, we spent a day thrifting in Hollywood, and I wanted to wear something comfy but still adorable. I opted for this burgundy cotton skirt from Target. It's super comfy and gives off an effortlessly cute feel! A solid colored skirt like this should be used as the focal point of an outfit. So, I paired mine with a cream colored lace top from Delia's. Since I don't have any crazy patterns going on, I like to add interest through different textures. However, be sure that one is more subtle then the other. That way they aren't competing.


To show off my figure, I cinched the outfit together with this dark brown waist belt from Forever21. When wearing loose fitting clothes, it's important to remember to show off your figure in some area. This way you don't look too frumpy.


To accessorize, I added this pair of aviators from Target and this hat I picked up while thrifting. I kept my hair understated, so that it wouldn't overwhelm the simpleness of the outfit. This braid is different, though. I braided one of the sections before braiding the three together. This makes it look much more interesting than the average braid.

Hope this post gave you some inspiration to look cute next time you're in a lazy kind of mood. Have a wonderful day! God bless!

Friday, February 10, 2012

Treasure Hunt

by Alyssa


Since moving to the LA area, we have both been dying to visit the Melrose Trading Post, which is a giant outdoor flea market (over 200 vendors!) in Hollywood. We finally made it over there last weekend!


The selection was incredible - we wandered around for almost 3 hours without getting bored, and I easily could have stayed longer. Also, how pretty are those rings up there?! Whether you're a college student on a tight budget like us, or if you just enjoy unique finds, thrift shopping is a great option. If you can find a large enough store or outdoor market, the possibilities are endless. Here are a couple quick thrifting tips for a flea market:


Tip #1: Go with a purpose in mind. If you have at least a general idea of what you're looking for, you will avoid getting overwhelmed! That way, you can focus on which racks and tables to search through, rather than looking at a little bit of everything. Of course, you will find many unexpected things which you may love, but having a direction is important.


Tip #2: Don't be afraid to bargain. We found that most vendors are willing to bargain a little bit for their items. Don't be too shy to ask if they will give you a piece for a few dollars under what they are asking! Brianna got an adorable shirt for $8 instead of $10 just because she asked.


Tip #3:Bring cash. This may seem obvious, but absolutely do not forget this! Not only is it far more convenient, but when you have cash, you can easily set a budget and stick with it.


If you're in the LA area, I would highly recommend checking out the Melrose Trading Post. Every city has great thrift stores, but it's a good idea to read reviews of the store online before you check it out! This will save you from wasting your time at a lame store. Good luck on your next thrifting adventure, and enjoy the treasure hunt! 

Monday, February 6, 2012

Santa Monica Sunshine

by Alyssa


Over the weekend, we drove to Santa Monica to spend some time on the beach. 75 degree weather in February is a nice change from what we're both used to in Seattle for this time of year!

 
It was nice to relax on the beach after a long week of school. My best friend flew in for the weekend so of course I had to take her to the beach!


This was our first time in Santa Monica, and we had lots of fun walking down the pier. We grabbed lunch at a little Italian bistro on Third Street Promenade, which also has lots of fun shops to look in. I hope you all had a great weekend!

Wednesday, February 1, 2012

Tribal Print Nail Tutorial

By Brianna


Spring is coming! A trend that always seems to show up during the spring and summer months is tribal print. A great way to keep up with this trend without having to add new pieces to your wardrobe is to be trendy with your nails. I love this look and have received many compliments on it throughout the past few days. It's super easy to do once you get the hang of it! Just remember, practice makes perfect! If you can't paint the thin lines, don't feel discouraged. It takes a while to perfect a steady hand.

I started out with a base coat from Sinful Colors. Most people forget to apply a base coat, but it's necessary because it protects your nails from the polish. I then used Blue Lagoon by Revlon for my base color.

Next, apply a half moon shape at the top of your nail. I used the color Sand Tropez by Essie for this. Keep in mind, it doesn't need to be absolutely perfect because you're going to outline it with white. If you can't paint the rounded shape by hand, you can try using some reinforcement stickers as a guide. I bought some for fairly inexpensive at Target.


Let that dry before you begin with the white. For this step you will need a thin nail brush. You can find this at any beauty supply store. If you don't have any around where you live, a thin art brush from a craft store will work as well. I used the color White Tip by Sally Hansen for this step. If you can't keep your hand steady, try resting it on a flat surface. Outline the half moon shape you just made. Then go in with a dotting tool (a bobby pin will work just as well) and create three dots near the cuticle.


Let that dry and then go in with a black color. I used a black polish by Sinful Colors. To create the pointed pattern, I used a different stroke each time I changed directions. So, I would paint upwards, lift my brush off the nail, re-adjust my hand position, and then paint downwards. Repeat these steps until the pattern fully crosses the length of your nail. After this dries, I went in with a dotting tool and added dots in between each peek.


I then used a regular nail polish brush and painted a straight line across the tips of my nails with the same black color I used before. Once you apply your top coat your finished! I love Sally Hansen Insta-dry as a top coat. It speeds up the drying, so you are free to use your hands sooner.

If you try out this design, let me know in the comments below! It's much simpler than it seems, and people will be amazed with the pattern. Thanks for stopping by our blog! Happy painting!

Pretty Flower Card


by Alyssa


It’s easy to run to the store to buy a birthday card for a friend, but why not make your own? Making your own cards is so simple and meaningful, plus it saves money! I always make homemade birthday cards for my friends and family. Here is a super quick and pretty design that can be used for almost any occasion. The card I’m making here is for my friend Vanessa’s birthday. 


First, gather your supplies. You will need two pieces of scrapbooking paper (normal construction paper is okay too), scissors, adhesive, a pencil, letter stickers, and a round object or stencil to trace. 


Choose the paper for your flower to be on (solid works best since both sides will show) and cut it into seven even circles. You can trace the circles using a stencil, like I did here, or use any other  round object (like a small drinking glass).


Fold the other paper in half and trim it if necessary. Attach one circle to the front of your card. Here I’m using a glue stick, but you can also use rubber cement, double stick tape, or anything else you have. 

To create a petal, fold two edges of the circle in. Repeat this with the other 5 circles.


Attach each petal to the circle and voila! You have a flower! Add your letter stickers to write a name or message on the front of the card. If you don't have letter stickers, you can always just use pretty handwriting to add the message.

Let us know in the comments if you try this out. Hope you’re all having a fabulous week!